Opening Provider Setup, click More.
1. Click Setup from the Desktop.
2. Click Providers from the Setup menu.
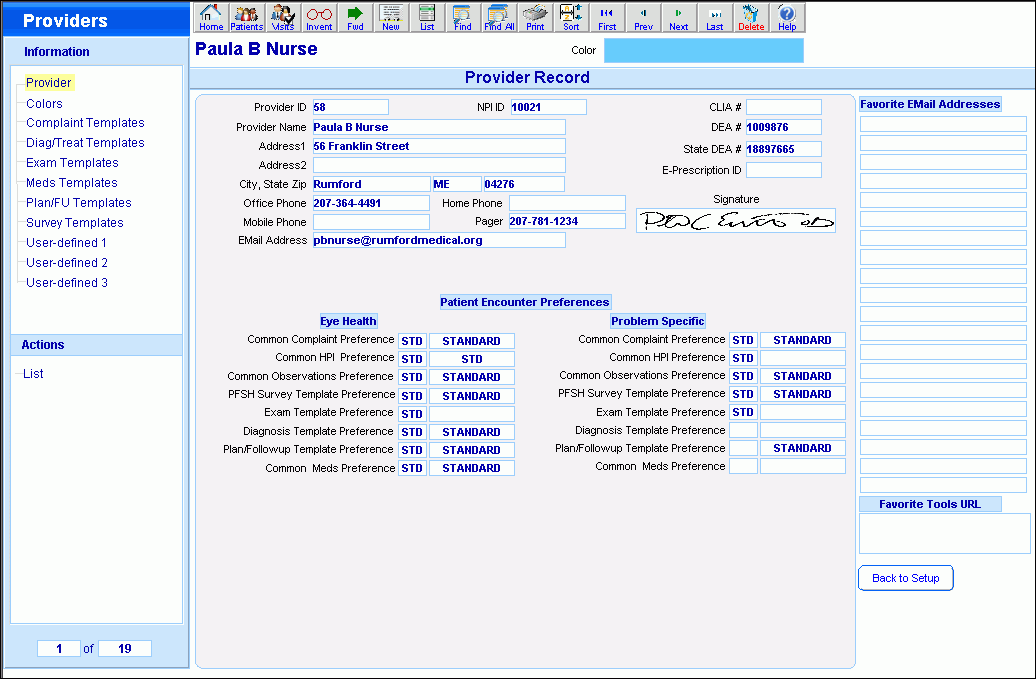
Provider File Window Example:
Creating a New Provider, click More.
To create a new record, click New  from the Toolbar.
Tip: To indicate that you are building a new provider, the provider maintenance window clears, the Provider ID is assigned and the template preferences default to STD.
|
Provider File Prompts Tip: To see more information about a field, click the hyperlink for the field name. | |
|
Provider ID |
Displays the unique identifier automatically assigned to the provider. |
|
Save |
All entries are automatically saved without further actions. |
|
|
To view all of the existing providers, click List. From the list you can select the record to change or delete. |
|
Provider Name |
Enter the name of the provider. |
|
Address1 |
Enter the first line of the provider's mailing address. |
|
Address2 |
Enter the second line of the provider's mailing address. |
|
City, State |
Enter the city portion of the provider's mailing address. |
|
State |
Enter the state portion of the provider's mailing address. |
|
Zip |
Enter the Zip Code for the provider's mailing address. |
|
Office Phone |
Enter the provider's office phone number. |
|
Home Phone |
Enter the provider's home phone number. |
|
Mobile Phone |
Enter the provider's mobile phone number. |
|
Pager |
Enter the pager number for the provider. |
|
Email Address |
Enter the email address for the provider. |
|
NPI ID |
Enter the provider's national provider identifier, which is a standard unique identifier for health care providers and health plans. |
|
CLIA # |
Enter the CLIA number, which is the lab number assigned by the state to the location if blood is processed at the location. |
|
DEA # |
Enter the provider's Drug Enforcement Agency (DEA) number, which a provider must have in order to prescribe drugs for patients. |
|
State DEA # |
Enter the provider's state issued Drug Enforcement Agency number. |
|
E-Prescription ID |
Note: This field is reserved for future use. |
|
Signature |
Displays the provider's electronic signature that is used to electronically sign the patient encounter information. Note: The provider's signature is set during the installation process. For more information, contact NDS Technical Support. |
|
Patient Encounter Preferences | |
|
Eye Health Note: To quickly access the templates maintenance routines, click the appropriate choice in the Provider Menu Tree. | |
|
Common Complaint Preference |
To specify the complaint template for the provider's patient encounters, click a choice in the drop-down list. |
|
Common HPI Preference |
To specify the HPI template for the provider's patient encounters, click a choice in the drop-down list. |
|
Common Observations Preference |
To specify the observations template for the provider's patient encounters, click a choice in the drop-down list. |
|
PSFH Survey Template Preference |
To specify the survey template for the provider's patient encounters, click a choice in the drop-down list. |
|
Exam Template Preference |
To specify the exam template for the provider's patient encounters, click a choice in the drop-down list. |
|
Diagnosis Template Preference |
To specify the diagnosis template for the provider's patient encounters, click a choice in the drop-down list. |
|
Plan/Followup Template Preference |
To specify the assessment plan and follow-up template for the provider's patient encounters, click a choice in the drop-down list. |
|
Common Meds Preference |
To specify the medications for the provider's patient encounters, click a choice in the drop-down list. |
|
Problem Specific Note: To quickly access the templates maintenance routines, click the appropriate choice in the Provider Menu Tree. | |
|
Common Complaint Preference |
To specify the common complaint template for the provider's problem specific patient encounters, click a choice in the drop-down list. |
|
Common HPI Preference |
To specify the HPI template for the provider's problem specific patient encounters, click a choice in the drop-down list. |
|
Common Observations Preference |
To specify the common observations template for the provider's problem specific patient encounters, click a choice in the drop-down list. |
|
PFSH Survey Template Preference |
To specify the survey template for the provider's problem specific patient encounters, click a choice in the drop-down list. |
|
Exam Template Preference |
To specify the exam template for the provider's problem specific patient encounters, click a choice in the drop-down list. |
|
Diagnosis Template Preference |
To specify the diagnosis template for the provider's problem specific patient encounters, click a choice in the drop-down list. |
|
Plan/Followup Template Preference |
To specify the assessment plan and follow-up template for the provider's problem specific patient encounters, click a choice in the drop-down list. |
|
Common Meds Preference |
To specify the medications for the provider's problem specific patient encounters, click a choice in the drop-down list. |
|
Favorite Email Addresses |
Note: These fields is reserved for future use. Please leave blank. |
|
Favorite Tools URL |
Note: This field is reserved for future use. Please leave blank. |
|
|
To return back to the Setup menu, click Back To Setup. |

Editing an Existing Provider, click More.
![]() CAUTION: To
avoid losing data, you must save new or changed records.
CAUTION: To
avoid losing data, you must save new or changed records.
1. To
display the record to be changed, enter the Provider
ID and press [TAB].
Tip: If
you do not know the Provider ID, you can click List  to see a list of Providers.
2. To position the pointer to the information that you want to change, press [TAB] or click the field using the mouse.
3. Enter the data changes.
4. To complete the edit process, click in any white space in the window.
Deleting an Existing Provider, click More.
1. To
display the record to be deleted, enter the Provider
ID and press [TAB].
Tip: If
you do not know the Provider ID, you can click List to see a list of Providers.
2. Click Delete from the Toolbar.
3. At the Delete Records prompt, click Delete to delete the record, or click Cancel to escape from the delete routine.
Example:
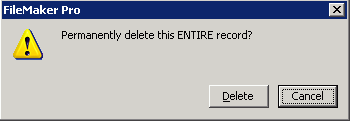
Note: After you click Delete, the record is deleted.