Check Entry - Pay Detail Area
Use the Pay Detail Area to enter payment information for the employee's paycheck. Some of the detail, such as pay rate, defaults from the standards set up during Employee Master Maintenance. The table following the window example describes the Pay Detail Area for Payroll Check Entry and Permanent Payroll Check Entry.
For routine entry, you usually need to enter only one detail line. However, to distribute pay among multiple departments or to enter information for more than one Other Pay Code (such as vacation time), you must use additional detail lines.
Directions:
To work in the Pay Detail Area...
Open Payroll Check Entry or Permanent Payroll Check Entry.
Complete the Employee Number Area.
Complete the Run Code Area (if applicable).
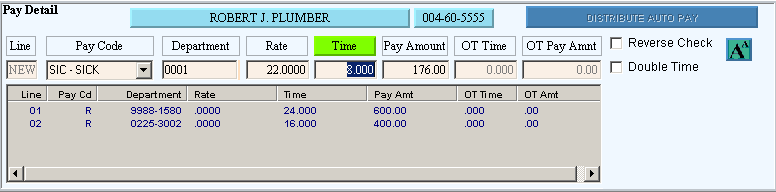
Example: In this example, pay was automatically distributed to two departments. Additionally, the operator is entering information for sick pay.
|
Pay Detail Area Prompts Tip: To see more information about a field, click the hyperlink for the field name. |
|
|
Heading |
|
|
Employee Name |
Displays the employee's full name (first name, middle initial, and last name). |
|
Displays the employee's Social Security Number. (11 characters, NNN-NN-NNNN) | |
|
Permanent Payroll Banner |
If you opened the Permanent Payroll Check Entry program, you will see the following banner:
|
|
Distributed Pay Banner |
The following banner displays if pay for the employee is set up to be distributed among multiple departments.
To automatically create the detail lines for each department, you can either press [ENTER] or click the Distribute Auto Pay banner. Notes:
|
|
Entry Fields Notes: After entering each line, click Add to update or add the information to the Detail List below. A separate detail line is required for each Other Pay Code. You also need separate lines when distributing pay to multiple departments (one line for each Department Number). |
|
|
Line |
The program automatically assigns a line number, which displays in the Detail List below the Entry Fields. |
|
The drop-down list displays the Other Pay Codes that were assigned to this employee and scheduled for this pay period. When adding a new detail line, use one of the following methods to select the Other Pay Code:
Notes:
| |
|
Enter the Department Number for this detail line. Depending on the module interface settings, the Department Number may actually be a General Ledger Account Number or an Appropriations Account Number. (up to 20 characters) Notes:
Tip: To
expand the size of the field, point to the right field border. When the
pointer changes into a horizontal double-headed arrow | |
|
Enter the hourly rate for the employee, if applicable. This value defaults to the rate assigned to the employee. (3.4 numeric) | |
|
If applicable, enter the time worked or to be paid (usually expressed in hours or days) for this detail line. (4.3 numeric) Note: Depending on the Other Pay Code this amount may apply to regular time worked or to time paid for holiday, vacation, or another Other Pay Type. Tip: To enter overtime, use the OT Time field. | |
|
Pay Amount |
The program calculates the Pay Amount (the Other Pay Amount Paid or the Regular Pay Amount Paid) for the selected Other Pay Code in this detail line. You can override the amount, if necessary. (7.2 numeric) Tip: The Other Pay Method Code controls the calculation. |
|
Enter the Overtime Time worked (usually expressed in hours or days). (4.3 numeric) Note: To automatically calculate double time, select the Double Time box. | |
|
The program calculates the Overtime Amount Paid. (7.2 numeric) Rate X OT Time = OT Pay Amount Note: To automatically calculate double time, select the Double Time box. | |
|
Detail List The Detail List displays the entered fields for each detail line. Notes: To add a new line to the list, click New in the Buttons Area, and enter the data in the Entry Fields. To change the information for an existing line, click the line item to load the data into the Entry Fields, and then make the changes. If the Detail List is inactive (all lines are gray), first click Detail in the Buttons Area, and then click the detail line. When you have completed the Entry Fields and want to add or update the information so it appears in the Detail List, click Add (or press [ENTER] if the button is in focus). |
|
|
Other Fields |
|
|
To change the amounts calculated to negative values so you can offset a posted check for cancellation or correction, select the Reverse Check box. Notes:
| |
|
Double Time |
To automatically calculate double time for the OT Pay Amount, select the Double Time box. Note: This option is active only when you enter Overtime Time. |
|
|
To change the font size of the data in the Detail List, click the Cycle Font Size button. Click the button repeatedly to cycle through three font sizes. |
|
Buttons |
To see a description of the Detail Options buttons and Selection buttons, see the Buttons Area topic. |
![]()


 ,
drag the border to the right.
,
drag the border to the right.
