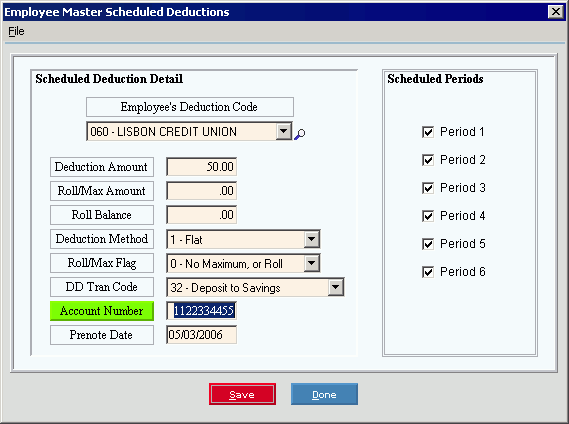
Savings Account Example: To see an example of a savings account deduction with direct deposit, click More.
In the example below, the employee contributes the Deduction Amount of $50.00 each pay period. The amount is directly deposited into the employee's savings account specified by the Account Number.
Example:
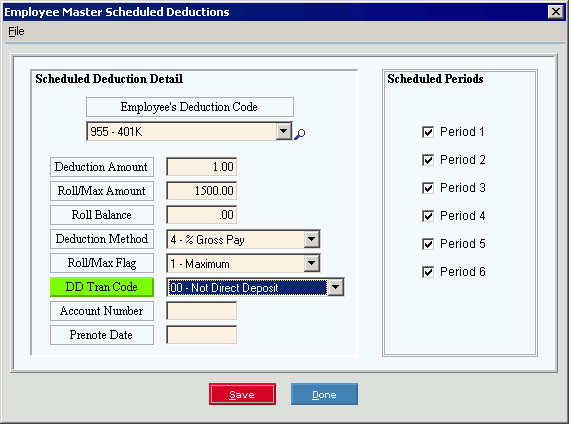
401K Example: To see an example of a 401K retirement account deduction with a maximum limit, click More.
In the example below, each pay period the employee contributes the Deduction Amount of 1% of the gross pay for 401K. If the employee's total deductions reach the maximum amount (Roll/Max Amount) of $1500.00 within the current year, the deductions cease. Next year, the deductions start up again.
Example:
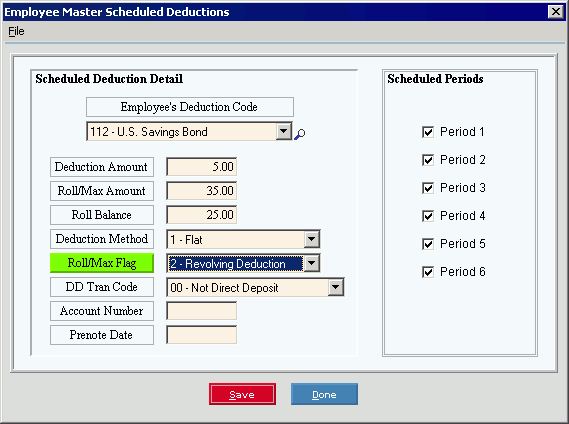
Savings Bond Example: To see an example of a savings bond deduction using a revolving (or rolling) amount, click More.
In the example below, the employee contributes the Deduction Amount of $5.00 per pay period toward the purchase of U.S. Savings Bonds. The system automatically updates the Rollover Balance with the total amount deducted so far in this roll cycle ($25.00 in this case). When the Rollover Balance reaches the revolving amount (Roll/Max Amount) of $35.00, the Revolving Deduction Rollover process automatically resets the Rollover Balance to zero and the Revolving Deduction Report triggers the employer to purchase a Savings Bond for the employee. The employee continues to contribute $5.00 each pay period, and when the Rollover Balance again reaches $35.00, another Savings Bond is purchased. This cycle repeats indefinitely.
Example:
Field Prompts: To see the prompts for maintaining the fields in the Scheduled Deductions Area, click More.
|
Scheduled Deductions Area Prompts Tip: To see more information about a field, click the hyperlink for the field name. | |
|
Click the Deduction Code in the drop-down list. (3.0, predefined) Notes:
| |
|
Enter the Deduction Amount for this Deduction Code. (5.2 numeric) Notes:
| |
|
Enter either a maximum or revolving dollar amount, as explained below. (7.2 numeric) Tip: The Roll/Max Amount works in conjunction with the Roll/Max Flag. To enter an amount for a...
| |
|
Displays the current Rollover Balance if the Roll/Max Flag is 2 - Revolving Deduction. (7.2 numeric)
Note: Refer to the Savings Bond example in the Examples section. | |
|
To identify how a Deduction Amount is processed, click one of the Deduction Method Codes in the drop-down list. (1.0 predefined) | |
|
To identify how the Roll/Max Amount is processed for a deduction balance click one of the following codes in the drop-down list: (1.0 numeric - predefined)
Note: For more information, refer to the Examples section. | |
|
To identify how the Deduction Amount is processed, click one of the Direct Deposit Transaction Codes in the drop-down list. (2.0 predefined) Tips:
| |
|
If applicable, enter the Employee Bank Account Number for direct deposit of the Deduction Amount. (up to 17 characters) Example: The employee may not choose to deposit the net pay into his or her checking account; however, he or she can still deposit a regular deduction to a Savings Account. See the Savings Account example in the Examples section above. | |
|
Enter the Prenote Date if you specified a direct deposit Account Number for the deduction. (MM/DD/CCYY) | |
|
The Scheduled Period selections default to the standard periods assigned to the Deduction Code. You can override the periods in which a deduction is processed by selecting or de-selecting the box next to each period. | |
|
|
To update the new or changed information, click Save, or press [ENTER]. Keyboard shortcut: [ALT + s] |
|
To avoid losing data, you must save the new or changed Scheduled Deductions information. | |
|
|
To return to the main Employee Master Maintenance window, click Done. Keyboard shortcut: [ALT + d] |

 Caution
 CAUTION
Removing Deduction Codes: To see how to remove a Deduction Code from the list assigned to the employee, click More.
 Caution: Removing
a Deduction Code from an employee also deletes any associated Deduction Amount Totals.
Caution: Removing
a Deduction Code from an employee also deletes any associated Deduction Amount Totals.
-
To display the record to be deleted, click the Deduction Code in the drop-down list.
-
Click File from the Menu Bar, and next click Delete.
Keyboard shortcut: [ALT] [f] [d] -
At the Delete Records prompt, click Proceed to delete the record, or click Cancel to escape from the delete routine.
Example: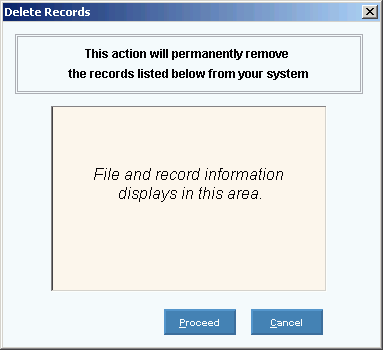
Note: After you click Proceed, you will see the following message on the Status Bar.