Use the W-2 Processing to generate, edit and print employee W-2s. In
addition, you can generate a file for submitting the employee W-2s electronically
to the IRS.
W-2 Processing Prompts
|
Starting
W-2 Processing
Each year before
you start the W-2 process, be sure to check all information for
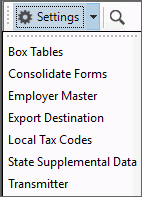
accuracy. Click Settings  to display the options. to display the options.
1.
Maintain the W-2
Employer information.
2.
Maintain the W-2
Box Tables for the deduction and other pay amounts to print
in boxes 10, 11, 12 and 14.
3.
Maintain the Local
Tax Codes if you assess local taxes.
4.
Perform maintenance for electronic filing, if you submit
W-2s electronically to the government:
a.
Maintain the W-2
Transmitter information.
b.
Maintain the file name and export location for the electronic
W-2 file during W-2
Export Destination Maintenance.
c.
Maintain the appropriate State
Supplemental Data to maintain additional information required
by the state for processing employee W-2s.
d.
Obtain or verify the submitter's user ID and password for
uploading the W-2 file to the Social Security Administration. |
Create
Employee W-2s
Use the Create
Forms function to create the employee W-2s for the current tax
year from the current payroll information. In addition,
the W-2s are used to generate the information in the W-2 file
if you are filing electronically. To
create employee W-2s, click Create Forms  and
the following screen displays: and
the following screen displays:
 Important: Important:
It
is important to run Create Forms AFTER
the last payroll run of the year and BEFORE you perform the
payroll
year end routines. Once you run the payroll
year end routines, the employee earnings and withholding information
for W-2s is cleared. While you can run
Create Forms as many times as necessary until the Payroll
totals are cleared, if you make edits to individual employee
W-2s using the Edit
Forms function the edits are lost each time you run Create
Forms. All deduction amounts
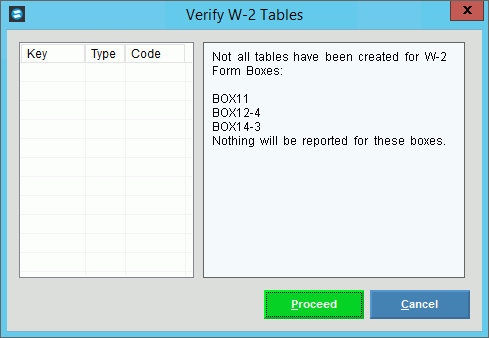
to be reported in boxes 10, 11, 12 and 14 must be set up before
running Create Forms. For information, see W-2
Box Tables.
|

|
To begin, click Proceed
or press [ENTER]. Keyboard shortcut: [ALT + p]
Or to escape from the routine, click
Cancel  .
Keyboard shortcut: [ALT
+ c] .
Keyboard shortcut: [ALT
+ c] |
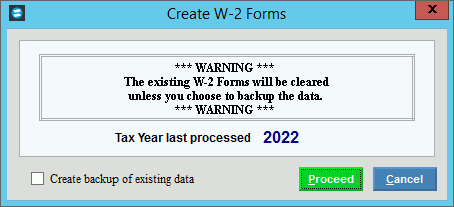
After
clicking Proceed, the
following window displays:
|
Tax Year last processed ccyy |
Displays the tax year of the last
create for your reference.
Note:
Confirm that the displayed Tax Year is the correct
year before proceeding with the routine. |
Create backup of existing data |
To maintain a backup file called
W2WORK, click to the box.
To omit maintaining a backup of the
data, leave the box blank. |

|
To create W-2s after confirming the
tax year is correct, click Proceed
or press [ENTER]. Keyboard shortcut: [ALT + p]
Or, to escape from the routine, click
Cancel  Keyboard shortcut: [ALT
+ c]
 |
Processing |
Displays
information pertaining to the various phases of the Create W-2
Forms routine to guide you.
 Important: The
Processing Window displays Process
Complete when the process is ended. Important: The
Processing Window displays Process
Complete when the process is ended.
To close the screen when Process
Complete displays and the routine is finished, click Close. Keyboard shortcut: [ALT + d]

|
Organizing
Employee W-2 List
The employee W-2s display in a list,
which can be sorted by any of the columns and filtered to narrow
the list of w-2s, if needed.

|
Sort |
The w-2
list can be sorted by information in any column employee number.
To sort, simply click the desired column heading. To sort in reverse
order, click the column heading a second time. |
Filter |
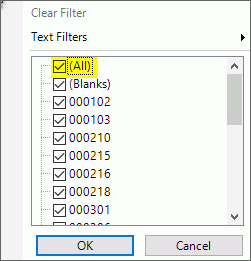
Filter can
be used to find specific information. For
example, to find for an employee, click Filter  by
Employee # column. From
the Filter choices uncheck All and then select the employee
# that you want to view.
Employee
# Column Filter Example:
|
|
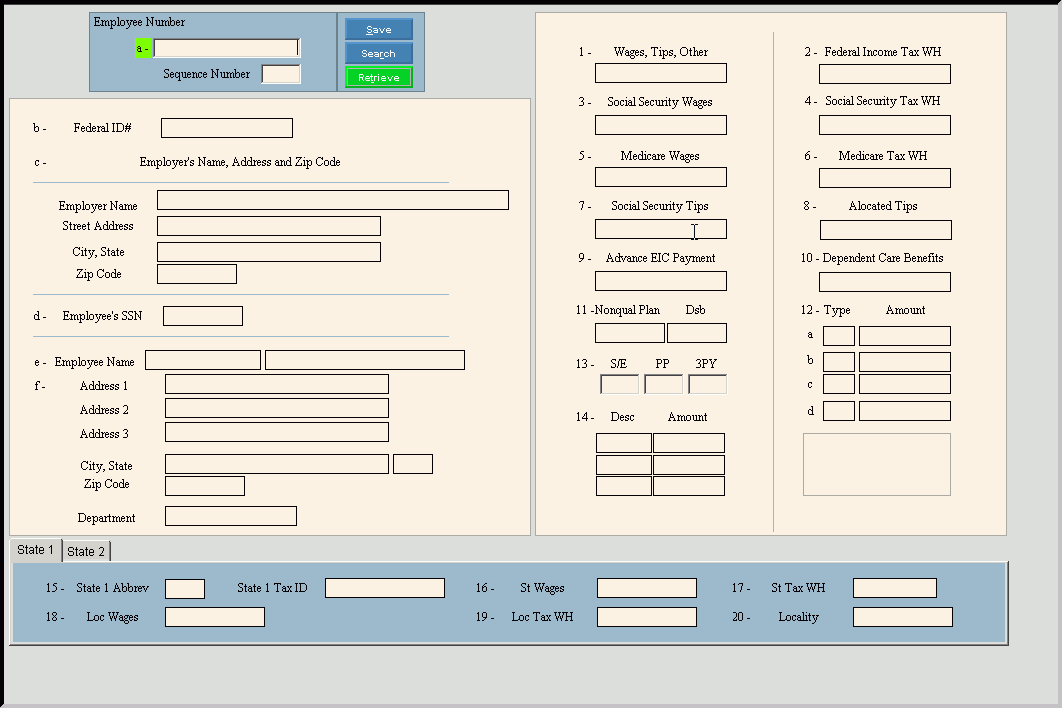
Use the Add
and Edit forms functions
to view, create, or edit individual employee W-2 information.
Both add and edit use the same screen, which displays in
the same format as the employee W-2 form. Any box amounts
that cannot be created through Create Forms function can be maintained
using this routine.
To
add a W-2, click Add  and the Edit W-2 Form screen opens. and the Edit W-2 Form screen opens. To
edit an employee W-2, double-click the desired employee. The
Edit W-2 form screen opens.
Notes:
Please
refer to the documentation provided by the IRS for assistance
with questions on specific entries within the boxes. The
letter or number that displays next to a field in this maintenance
corresponds to the letter or number for a specific box on
the W-2 form. For
more information, see the W-2 Forms Process.
Edit
W-2 Forms Window Example:
|
|
If you are
editing a W-2 the employee number for the employee W-2 is displayed.
If you are building a new employee
W-2 enter the employee number and click Retrieve.
New  displays near the employee
number. Default entries display and the first field is highlighted
to let you know you can begin entering information. displays near the employee
number. Default entries display and the first field is highlighted
to let you know you can begin entering information. |
Sequence
Number |
Displays
the first sequence number for the employee, if an employee has
multiple W-2s. To change, enter the new sequence number
for the appropriate W-2 for the employee. |
Federal
ID# |
Displays
the submitter's Federal ID number. (up to 11 characters, xx-xxxxxxx) |
Employer
Name - Zip Code |
The following fields contain the
information maintained during W-2
Employer Maintenance and are display-only.
Employer Name - Displays
the employer name. Street Address - Displays
the employer street address. City, State - Displays the
employer city name and state. Zip Code - Displays the
employer zip code. |
Employee
Name |
Displays
the in
the first box. You can enter another employee first name
and middle initial, if needed. The displays in the second box. You enter another
employee last name if needed. (up to 15 characters per box) |
Employee
Address |
The employee
address information includes:
Address 1, 2, 3 - The 3
lines for the
displays. You can enter the new mailing address lines,
if needed. (up to 20 characters, per
line)
-
The city name and state for the employee mailing address displays.
You can enter another city and state, if needed. - The zip
code or the Zip+4 code for the employee mailing address displays.
Enter another zip code, if needed. (up to 11 characters) |
|
The department
number for the employee displays, but can be changed if needed.
(up to 8 characters) |
W-2
Fields |
The W-2
amounts:
- The dollar amount for the employee's accumulated wages,
tips and other compensation displays, but can be changed if
needed. (7.2 numeric)
- The accumulated dollar amount for the federal income tax
withheld for the employee displays, but can be edited if needed.
(7.2 numeric)
- The accumulated dollar amount for the employee's social
security wages displays, but can be edited if needed. (7.2
numeric)
- The accumulated dollar amount withheld for social security
taxes for the employee displays, but can be edited if needed.
(7.2 numeric) - The
dollar amount accumulated for the employee's Medicare wages
displays, but can be edited if needed. (7.2 numeric) Medicare Tax WH - The accumulated
dollar amount withheld for the employee's Medicare tax displays,
but can be edited if needed. (7.2 numeric) Social Security Tips - The
accumulated dollar amount for the employee's social security
tips displays, but can be edited if needed. (7.2 numeric) - The
dollar amount allocated for employee tips, if you are a food
and beverage establishment displays, but can be edited if
needed. (7.2 numeric) Advance EIC Payment - The
dollar amount paid to the employee as advance earned income
credit displays, but can be edited if needed. (7.2 numeric) Dependent Care Benefits
- The dollar amount for dependent care benefits under a dependent
care assistance program paid or incurred by the employer for
the employee displays, but can be edited if needed. (7.2 numeric) Nonqual Plan Dsb - Enter
the amounts from box, 1, 3 or 5 that was earned in a prior
year, if applicable. (7.2 numeric) Type - Displays the IRS
type code that pertains to the amount in box 12.
Tip: The IRS
type code is the box 12 type setting maintained during W 2
Box Table Maintenance. Amount - Enter the dollar
amount that pertains to the code in box 12. (7.2 numeric) S/E - If the employee is
a statutory employee whose earnings are subject to social
security and Medicare taxes but not subject to federal income
tax withholding, enter Yes.
Otherwise, enter No. PP - If the employee actively
participated in a retirement plan for part of the year, enter
Yes. Otherwise, enter
No. 3PY - To specify a sick
pay indicator, enter 1.
Otherwise, please leave blank. (1.0 numeric)
Note: You can
maintain up to three types and amounts for box 14. Desc - Displays the description
associated with the amount in box 14.
Tip: This description
is maintained during W-2
Box Tables. Amount - Enter the amount
associated with box 14. (7.2 numeric)  - To display state 1
information, click State
1. - To display state 1
information, click State
1.
Or, to display state 2 information, click State
2.
State Abbrev - Displays
the state abbreviation associated with the
assigned to the employee. State 1 Tax ID - Enter the
state tax identification number. (up to 11 characters) - The accumulated
dollar amount for the employee's state wages displays,
but can be edited if needed. (7.2 Numeric) - The accumulated
dollar amount withheld for the employee's state taxes displays,
but can be edited if needed. (7.2 numeric) LOC Wages - The accumulated
dollar amount for the employee's local wages displays, but
can be edited if needed. (7.2 numeric) LOC Tax W/H - The accumulated
dollar amount withheld for the employee's local taxes displays,
but can be edited if needed. (7.2 numeric) Locality - The name of the
locality for local withholding tax displays, but can be edited
if needed. (up to 7 characters) |

|
To update
the new or changed information, click Save or press [ENTER]. Keyboard
shortcut: [ALT + s] |
 CAUTION: To avoid losing
data, you must save new or changed information. CAUTION: To avoid losing
data, you must save new or changed information.
|
Deleting
a W-2

|
1.
Click highlight the desired employee W-2 or to select multiple
W-2s check the select box for the desired employees.
2. Press [Delete]
or click Delete  . Delete becomes active when employees are
selected. . Delete becomes active when employees are
selected.
3. At the Delete confirmation,
click Yes to delete
or click No
to cancel deleting.

|
Printing
W-2s
To print the employee W-2 forms, click
Print  .
You can print the employee W-2s as many times as necessary
and you have the option of printing an individual employee W-2,
if needed. .
You can print the employee W-2s as many times as necessary
and you have the option of printing an individual employee W-2,
if needed.
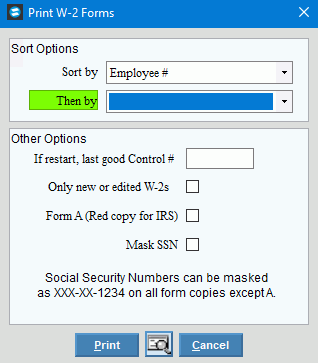
Print
W-2 Forms Window Example:
|
Sort By |
To specify the first sort sequence,
click a choice in the drop-down list.
Notes:
To
print copy A of W-2 forms for submitting paper copies to the
IRS, select Federal copy A forms as the 1st Sort Sequence
and employee name as the Sort by sort. If
sort by is blank, the W-2s print in random order. |
Then Sort By |
To specify the second sort option,
click a choice in the drop-down list. |
If restart, last good control # |
If your W-2s stopped printing unexpectedly,
perhaps because of a printer jam, you can restart it.
If
this is not a restart, then leave this box blank. If
this is a restart, enter the last good employee number that
printed. |
Only new or edited W-2s |
To only print the employee W-2s that
are new or edited since the last print, click to check this box.
To print all employee W-2s, leave this
box blank. |
Form A (red copy for IRS) |
To print copies of form A, which
is the red copy for the IRS, check this box. Social security
numbers are fully printed on form A. |
Mask SS (XXX-XX-1234) |
To truncate the display of the employee
social security number on the W-2s, check this box.
To display the full employee social
security number on all copies of the W-2s, leave this box unchecked. |


|
To begin printing, click Print
 , or press [ENTER]. Keyboard
shortcut: [ALT + p] , or press [ENTER]. Keyboard
shortcut: [ALT + p]
Or, to print to the screen, click Print View  . .
Or, to escape from the print routine,
click Cancel  . .
Keyboard
shortcut: [ALT + c] |
Print
W-3
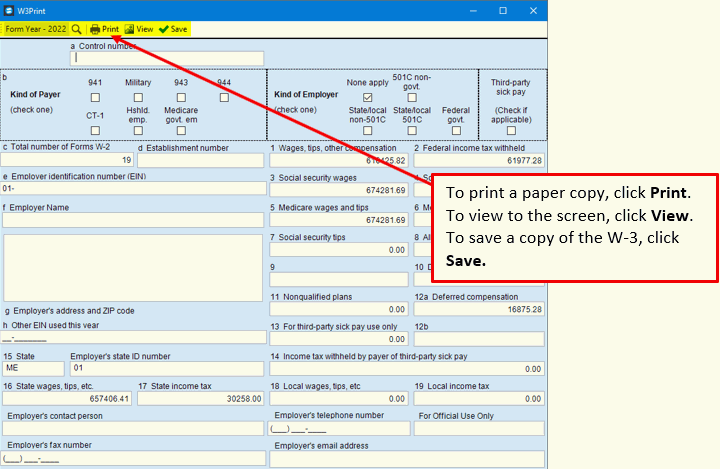
Use W-3 Print to print the summary
totals for your W-2s. You can use this function if you are
submitting paper W-2s. To start, click Print
W-3 and the following screen displays.
Note:
You only need to print W-3 if you submit paper W-2s
to the IRS.
|
Creating a W-2 Export File
To create the employee W-2 file for
electronic submission to the Social Security Administration use
the W-2 Export function. While all employers are eligible
to submit W-2s electronically,
filers with 10 or more information returns in a calendar year
are required to file electronically. To create the
export file, click Export  . .
 Important:
For
reconciliation purposes, it is important that you print the
W-2 File Report that
is available at the end. The totals on the W-2 File
report should match the W-2 totals accumulated during W-2
printing. To see a report sample, click here. If
the W-2 file is returned by the government because of errors,
you must make the necessary corrections using the Edit function,
run the Export again and re-send the file. If you re-submit
the file, you must check Resubmit
and maintain the Wage File Identifier provided by the Social
Security Administration. For more information, please
contact NDS Support
at 800-649-7754. The
W-2 Export file does not
include employees with no earnings or withholdings
to report. Employers
are required by law to maintain at least the previous four
years electronic W-2 files. After sending your W-2 file,
it is important that you rename your file to include the year.
Make sure to save copies of each applicable year on
some type of removable media such as, a tape, disk or save
copies at a location that is backed up regularly.
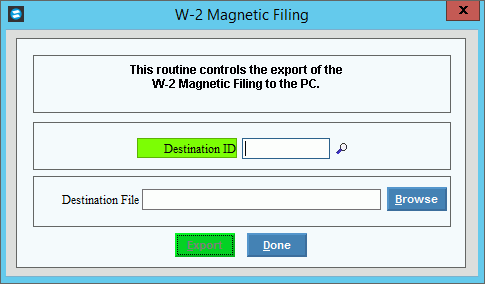
W-2
Electronic Filing Window Example:
|
|
Enter the defined destination ID
that was created during W-2
Export Destination. The destination ID specifies the
characteristics of the file and the location of the W-2 Export
file.
Note:
To search for a destination ID, click Search
 or press [CTRL
+ f]. or press [CTRL
+ f]. |
|
The Destination file associated with
the destination ID displays. (up to 80 characters)
Note: To look for another destination file,
click Browse  or press [CTRL + b]. or press [CTRL + b]. |

|
To run the routine, click Export,
or press [ENTER].
Keyboard shortcut: [ALT + e] |
After
you click, Export the
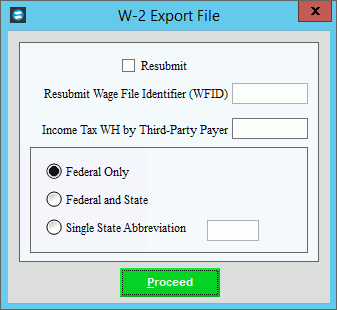
W-2 Export File window displays:
|
Resubmit |
Leave this box unchecked if this
is the first time the W-2 Magnetic file is being submitted for
the year
If you are re-submitting the file,
check Resubmit and
then enter the wage file identifier provided by the Social Security
Administration.
Note:
Generally, if the W-2 Magnetic file was returned because
of errors, you must make the necessary corrections using Edit
Forms. Then, you can run the Magnetic File routine again
and re-send the file. |
Resub Wage File Identifier (WFID) |
If
you are re-submitting the Magnetic file and you checked Resubmit,enter
the wage file identifier that you received from the SSA when the
previous W-2 Magnetic file was returned unprocessed by the SSA.
Note: This
field is only active, if you selected Resubmit above. |
Income Tax WH by Third Party Payer |
If income tax was withheld for a
third party payer, enter the amount.
Otherwise, leave blank.(7.2 numeric)
Tip:
This amount is submitted with the totals. |
Fed
Fed and State
Single State Abbr |
To specify the information to include
in the file, click a choice:
Federal Only - Creates
the file for the federal government only Federal and State - Creates
the file for the federal government and all
applicable states Single State Abbreviation
- Creates the file for the federal government and the specified
state
Notes:
If
all of your employees are from the same state, select Fed & State. Maine
requires that no other
state information be included in the file sent to them. If
there are employees from both Maine and New Hampshire, you
will create a file for ME and export it, then create a file
for New Hampshire and export it. The employee state
is determined by the maintained
during Employee
Maintenance. To
maintain a copy of the federal file without any state information,
select Federal Only. |
Single State Abbr |
If you selected Single
State Abbreviation, enter the 2-character postal service
state abbreviation for the state information to include in the
Magnetic file. (2 characters)
Note:
This field is only active, if Single State Abbreviation
is selected. |

|
To run the routine, click Proceed
or press [ENTER]. Keyboard shortcut: [ALT + p] |
W-2 Export File Processing Window
Displays information pertaining to
the W-2 Export process to guide you. When the export is
finished, print the W-2 Magnetic File report by choosing the options
below.
 Important: The
status displays Process Ended
when complete. Important: The
status displays Process Ended
when complete.
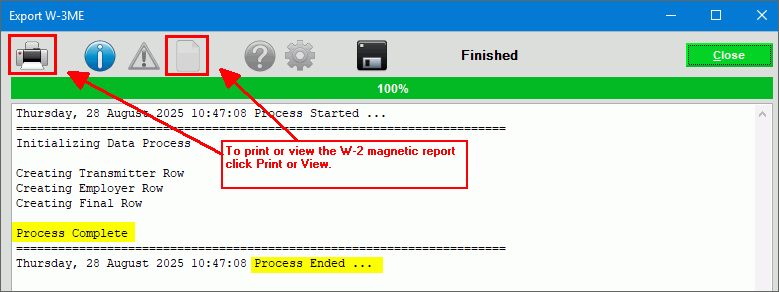
You can print, view to screen or save
the W-2 Magnetic file report by choosing one of these options:
To
print the report, click Print
 . . To
view the report to the screen, click View
Report  . . Or,
to save a copy of the report and Export processing messages,
click Save as Text File  Note: NDS recommends
that you print the report and compare the totals with the
W-2 totals. If the totals do not match, please contact
NDS Support at 1-800-649-7754 for assistance. To
close the routine when the routine is finished, click Close  .
Keyboard shortcut: [ALT
+ c] .
Keyboard shortcut: [ALT
+ c] |
![]() Important W-2 Reporting Reminders:
Important W-2 Reporting Reminders:


 and the Edit W-2 Form screen opens.


 .
You can print the employee W-2s as many times as necessary
and you have the option of printing an individual employee W-2,
if needed.

 .
.


 .
.
 .
Keyboard shortcut: