Or, use the Keyboard shortcut: [ALT] [v] [a]
Account Master Maintenance
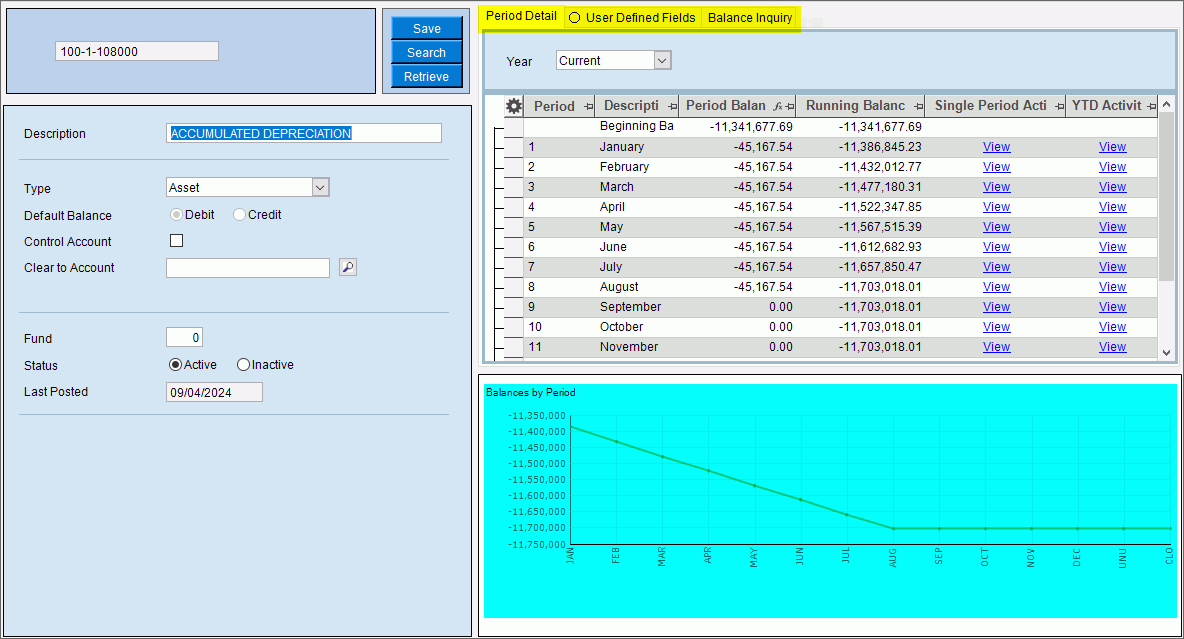
Use Account Master Maintenance to maintain information about General Ledger accounts, which make up the Chart of Accounts. The current and historical years' period balances display along with a graph provides a visual view of the balances. You can run a single period activity report and a YTD activity report for the account to see the detail that makes up the period balances. There is also an Account Balance Inquiry function that allows you to compare actual, history and budget period amounts if desired. The Inquiry includes three comparison columns that you select with each column row representing a Period. The Account Master also offers optional user definable alpha and numeric fields for maintaining information that is specific to your organization. The user definable fields are informational only and can be used for reporting purposes.
Tips:
For more information about the structure of the Account Number, see Understanding Account Numbers.
To copy one or more Account Numbers, use the Copy General Ledger Accounts utility.
Directions:
To open click Account Master Maintenance
![]() on the Toolbar.
on the Toolbar.
Or, use the Keyboard shortcut: [ALT]
[v] [a]
Account Master Maintenance Window Example:
Account Master Maintenance Prompts
|
|
Enter the G/L Account Number. (format varies) To create a new account,
enter the account number and press [ENTER]
and click Retrieve To look for an account, click Search Required Tips:
|
|
To specify the Fiscal Year you want to display in the Period Balances List, click one of the options in the drop-down list.
|
|
|
To update the new or changed information, click Save or press [ENTER]. Keyboard shortcut: [ALT + s] |
|
|
Enter the account description. (up to 30 characters) |
|
To specify an account type, click one of the options in the drop-down list. Account types include Asset, Liability, Net Worth, Income, and Expense. |
|
Select Debit or Credit Option to specify if amounts are posted to the account as debits or credits. Notes:
|
|
To specify this is a control account, which is an account used by interfaces from other software applications, check this box. Typical control accounts include Accounts Receivable, Accounts Payable, Inventory, and Payroll Tax accounts. If this is not a Control Account, leave this box unchecked. Tip: The program displays a warning and prints an exception if you enter a manual transaction for a Control Account. |
|
For an income or expense account, enter the Clear To account number, to which accounts are cleared during the Year-End process. Tips:
|
|
Enter the Fund number, which is a category number that lets you select groups of accounts for the Trial Balance Report. (4.0) Tip: This optional field is typically used by municipalities that use Fund Accounting. |
|
To specify if the account is Active or Inactive, click the desired option. Note: You cannot enter or post transactions for inactive accounts. |
|
|
Displays the last date that entries were posted to the account. |
|
|
To set up
user defined fields, click Edit
Field Definitions |
Period Detail The Period Balance List displays the following information and the account balance for each row for the selected year for the displayed account. |
|
Displays the period for your reference |
|
Displays the period description for your reference. |
|
Displays the account's balance for the period. |
|
Displays the calculated running balance for the account for each period, which is the sum of the beginning balance plus the amounts of the entries for the period. |
|
To see detail for an account balance for the highlighted period with the Single Period Activity report, click View. The report view screen opens and displays the report. |
|
To see the details that make up the account balance click View for the desired period. The YTD Period Activity report will list entries from the beginning period to the highlighted period. The report view screen opens and displays the report. |
|
Balances by Period |
Displays the period balances in a visual graph for quick review. |
Balance Inquiry Use the Inquiry to review and compare period balances to actual, history and budget period amounts. The Inquiry includes three comparison columns that you select with each row representing a period. This allows you to compare up to three different data sources at a time to the account's period balances. |
|
Setting up an Inquiry |
To view the period balances for an account: 1. Click Balance Inquiry. 2. Select the Source Options for each column. You can choose only 2 columns if desired. 3. Click Save
Default View
|
Use the Columns Source 1-3 to specify the source data to display in the columns for comparison. For each column, you can specify one of three sources of data including actuals, history, or a budget. You can mix and match the sources as desired; for example, you can display three different budgets in the comparison columns. In the drop-down list, click the option for the data source that you want to display in the first comparison column. (predefined) Options:
Tip: The description of the column displays next to the Column Option. |
|
|
If you want
to save the comparison data sources for future use, click Save Default View |
Inquiry Information |
|
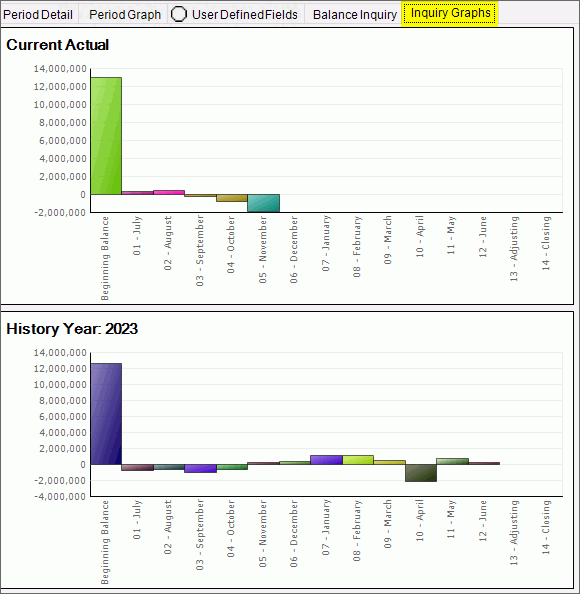
Inquiry Graph The Inquiry Graph provides a visual representation of the account information that was shown in the Balance Inquiry. To see the graph, click Inquiry Graph.
|
|
User Defined Fields
Use the Account Master user definable fields to maintain additional account information for your facility if desired. The account user definable fields are informational only and can be used for reporting purposes. To see user defined fields, click the User Defined Fields tab. In this area you can set up the user defined fields and maintain G/L account related information for your organization. When you enter data in the fields you will notice that you can only enter the type of data that was specified when the field was set up. Alpha user defined fields will have drop-down lists from which you can choose an entry or you can enter an entry that is not listed. To add information simply click in the field and begin entering the information. Adding an entry will make it available for the next time. Be sure to save to complete your entries. Notes:
|
|
Editing an Account |
1. Enter the account
number and press [ENTER]
or click Retrieve
2. Enter the data changes. 3. Then, click Save |
Deleting an Account |
1. Enter the account
number to remove and press [ENTER]
or click Retrieve
2. Click File
from the menu, and
next click Delete. |
![]()