Opening GUI Admin for Maintaining Users, click More.
To open GUI Administrator for CURL system users:
1. From your Desktop, click Start.
2. Click Programs.
3. Click NDS.
4. Click GUI Admin.
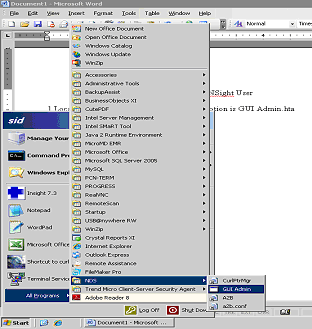
To open GUI Administrator for X/RTS system users:
1. Use Internet Explorer to access w:\web on yourservernamehere.
2. Open the directory W:\nds\mkuser.
3. Click guiadmin.hta.
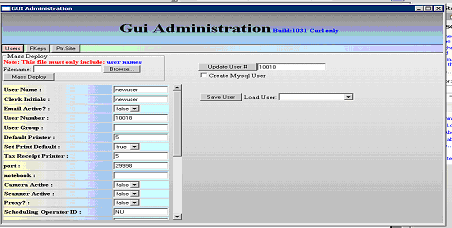
GUI Administrator Window Example:
Creating a New User, click More.
Tip: Default entries display. Only maintain the fields noted with an Asterisk *.
|
GUI Administrator Prompts Tip: To see more information about a field, click the hyperlink for the field name. | |
|
* User Name |
Enter the User Name to use to log onto the system. (up to 6 characters) |
|
* Clerk Initials |
Enter the user initials as the Clerk Initials. |
|
Email Active? |
Note: Maintain the default setting for this field. |
|
User Number |
Note: Maintain the default setting for this field. |
|
* User Group |
Enter ES for the preset function keys for the sure. |
|
Default Printer |
Note: Maintain the default setting for this field. |
|
Set Print Default |
Note: Maintain the default setting for this field. |
|
Tax Receipt Printer |
Note: Maintain the default setting for this field. |
|
Port |
Note: Maintain the default setting for this field. |
|
Notebook |
Note: Maintain the default setting for this field. |
|
Camera Active |
Note: Maintain the default setting for this field. |
|
* Scanner Active |
If the user will be using a scanner, select True. Otherwise, maintain the default setting of False. |
|
Proxy? |
Note: Maintain the default setting for this field. |
|
* Scheduling Operator ID |
Enter the identification of the user for scheduling, if applicable. Note: This field only pertains to INSight. If you maintain an ID here and in INSight, the Scheduling Operator ID will automatically fill in for the user during scheduling. |
|
Operator ID |
Note: Maintain the default setting for this field. |
|
Demo Profile? |
Note: Maintain the default setting for this field. |
|
Coder Profile? |
Note: Maintain the default setting for this field. |
|
Super User Profile? |
Note: Maintain the default setting for this field. |
|
Graphic Effects? |
Note: Maintain the default setting for this field. |
|
* Terminal User? |
To set this field to Terminal User, select True. |
|
Local Root? |
Note: Maintain the default setting for this field. |
|
Allow Background Print Jobs? |
Note: Maintain the default setting for this field. |
|
Allow Background Process Jobs? |
Note: Maintain the default setting for this field. |
|
Stream Print Jobs? |
Note: Maintain the default setting for this field. |
|
Allow Write? |
Note: Maintain the default setting for this field. |
|
Allow Delete? |
Note: Maintain the default setting for this field. |
|
* Read Only Applications? |
If the user should only be allowed to read data within an application, enter the application name. Otherwise, leave blank. |
|
NDSServer Administrator? |
Note: Maintain the default setting for this field. |
|
* Save User |
To save the user information, click Save User. |
|
To avoid losing data, you must save new or changed records. | |
Editing an Existing User, click More.
![]() CAUTION: To
avoid losing data, you must save new or changed records.
CAUTION: To
avoid losing data, you must save new or changed records.
1. To position the pointer to the information that you want to change, press [TAB] or click the field using the mouse.
3. Enter the data changes.
4. To complete the edit process, click Save User .
Deleting an Existing User, click More.
To delete a User who is no longer working at your facility or who has changed their work responsibilities:
1. Use Internet Explorer to access w:\web on ndsserv.
2. Open the following directory W:\resources\home\users.
3. Find the desired User directory and right-click to open the shortcut menu.
4. Click Delete.