Click Change Type/Location ![]() .
.
Fill in the window.
Click OK ![]() to display the Appointment Book column.
to display the Appointment Book column.
Select the time slots to change.
Scheduling - Amend Layout Appointment Type and Location
Use the Amend Layout Appointment Type and Location window (entitled Amend Layout/Type) to change the Scheduling Appointment Type and Location for specified time slots in the Appointment Book Area. The table following the window examples describes the Amend Type/Layout window for the Amend Layout process.
Tips:
For more information about the procedures for changing the Appointment Type and Location, see the Scheduling - Amend Layout Step-By-Step Examples.
For more information about working with data in fields, see Data Entry Guidelines.
Directions:
To display the Amend Type/Layout window:
Open Scheduling to display the Appointment Book Area.
Launch Amend Schedule from the Scheduling Shortcut Menu.
Tip: For additional information, click More.
At the Change Schedule Layout window:
Click Change Type/Location ![]() .
.
Fill in the window.
Click OK ![]() to display the Appointment Book column.
to display the Appointment Book column.
Select the time slots to change.
To select a single time slot, click to highlight the line.
To select several contiguous time slots, click to highlight the first line. Press and hold [SHIFT] and then click the last time slot. The entire block is highlighted.
To select several noncontiguous time slots, press and hold [CTRL]. Click to highlight each time slot. Release [CTRL] after all desired time slots are highlighted.
Right-click to display the Scheduling Shortcut Menu.
Click Perform Amend.
Fill in the Amend Type/Layout window.
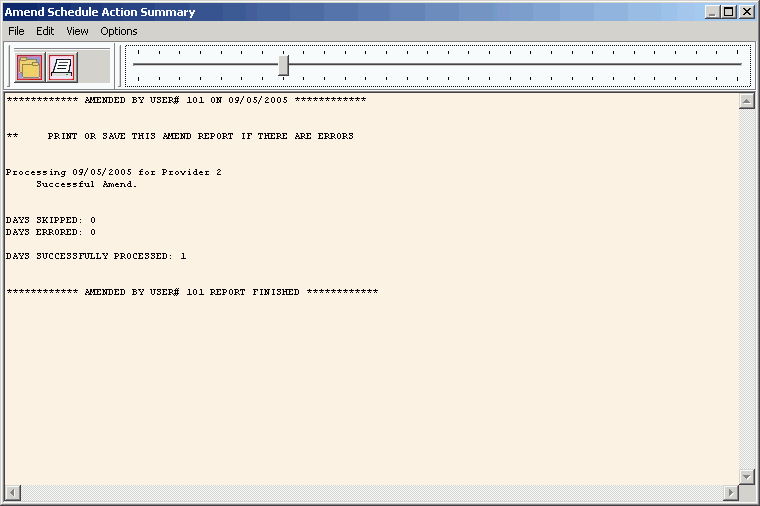
Tip: After completing the Amend Type/Layout window, you will see a window displaying the Amend Schedule Action Summary Report. To see an example, click More.
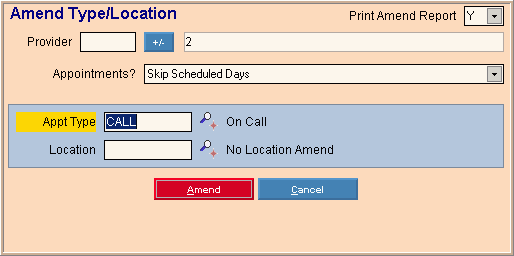
Amend Type/Location Window (no appointment changes) Example:
Tip: If there are no reserved time slots being changed, you only have to fill in the fields displayed in this example.
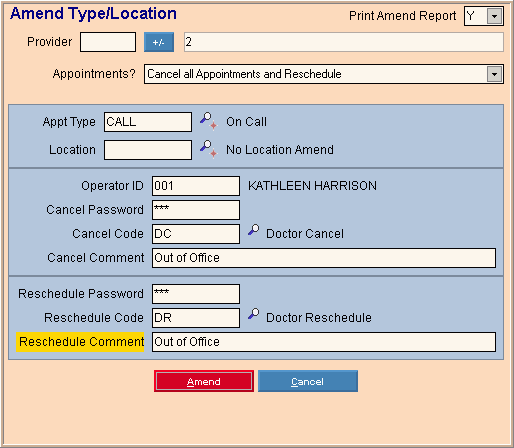
Amend Type/Location Window (with appointment changes) Example
Tip: If there are any reserved time slots being changed, you may have to fill in additional fields to cancel and reschedule the appointments.
|
Scheduling - Amend Layout Appointment Type and Location Amend Type/Location Window Prompts Tip: To see more information about a field, click the hyperlink for the field name. Note: You will see this window only if you clicked Change Type/Location |
|
|
Click one of the following options in the drop-down list, if you want to display and print the amendment report after completing the amendment changes. (Y/N)
Tip: A User Scheduling Preferences setting controls the default value. |
|
|
You can specify that the changes take place for one or more providers. For example, you can add providers if you are blocking out meeting time for all of the providers in the practice. To add providers:
Note: Frequently you can skip this field. When you select the day to change at the Appointment Book Area, INSight automatically adds that provider to the list in this window. |
|
|
|
To add a Scheduling Provider Code to the Provider List, click Plus/Minus. |
|
Provider List |
Displays the list of Scheduling Provider Codes that will be amended. |
|
Click one of the Appointment Amendment Actions in the drop-down list: Required
|
|
|
If applicable, enter the new Scheduling Appointment Type ID for the time slots that you are changing. (up to 6 characters) Note: You can also enter an Appointment Category ID or an Appointment Set ID. Tip: To search for an Appointment Type ID, click Search |
|
|
If applicable, enter the new Scheduling Location Code for the time slots that you are changing. (up to 2 characters) Tip: To search for a Location Code, click Search |
|
|
If you selected an action that requires you to cancel or reschedule appointments, you must enter your Scheduling Operator ID. (up to 4 characters) Required (if prompted) |
|
|
Cancel Appointment Fields Tip: If you selected an action that requires you to cancel appointments, INSight prompts you to enter the following fields. |
|
|
Enter the case-sensitive password for cancelling appointments. (up to 8 characters) Required (if prompted) |
|
|
Enter the Scheduling Cancel Code ID. (up to 8 characters) Required (if prompted) Tip: To search for a Cancel Code, click Search |
|
|
Enter the Appointment Cancelled Comment Line 1. (up to 55 characters) |
|
|
Reschedule Appointment Fields Tip: If you selected an action that requires you to reschedule appointments, INSight prompts you to enter the following fields. This adds the appointments to the reschedule list, where you can later process them. |
|
|
Enter the case-sensitive password for scheduling appointments. (up to 8 characters) Required (if prompted) |
|
|
Enter the Reschedule Code ID. (up to 8 characters) Required (if prompted) Tip: To search for a Reschedule Code, click Search |
|
|
Enter the Appointment Reschedule Comment Line 1. (up to 55 characters) |
|
|
Buttons |
|
|
|
To make the changes to the Appointment Book Area layout, click Amend. Keyboard shortcut: [ALT + a] |
|
|
To cancel the amendment, click Cancel. Keyboard shortcut: [ALT + c] |
![]()