Click Enter the Vehicle Information in the Steps Panel.
Or,
click Next ![]() or
click Back
or
click Back ![]() until
the data that you want to maintain displays in the Data Entry Panel.
until
the data that you want to maintain displays in the Data Entry Panel.
Data Entry Utility Wizard - Enter Vehicle Information Step
Use the Enter Vehicle Information Step to enter the information about the make, model and other applicable vehicle information. The table following the panel example describes the data entry for this step in the Data Entry Utility Wizard.
Tips:
For general information about using wizards, see the Wizard - Introduction.
For more information about working with data in fields, see the Data Entry Guidelines.
Directions:
To display the Enter Vehicle Information Step in the Data Entry Panel:
1. Open the Data Entry Utility Wizard.
2. To navigate to the step that you want to maintain:
Click Enter the Vehicle Information in the Steps Panel.
Or,
click Next ![]() or
click Back
or
click Back ![]() until
the data that you want to maintain displays in the Data Entry Panel.
until
the data that you want to maintain displays in the Data Entry Panel.
Data Entry Panel - Enter Vehicle Information Step Example:
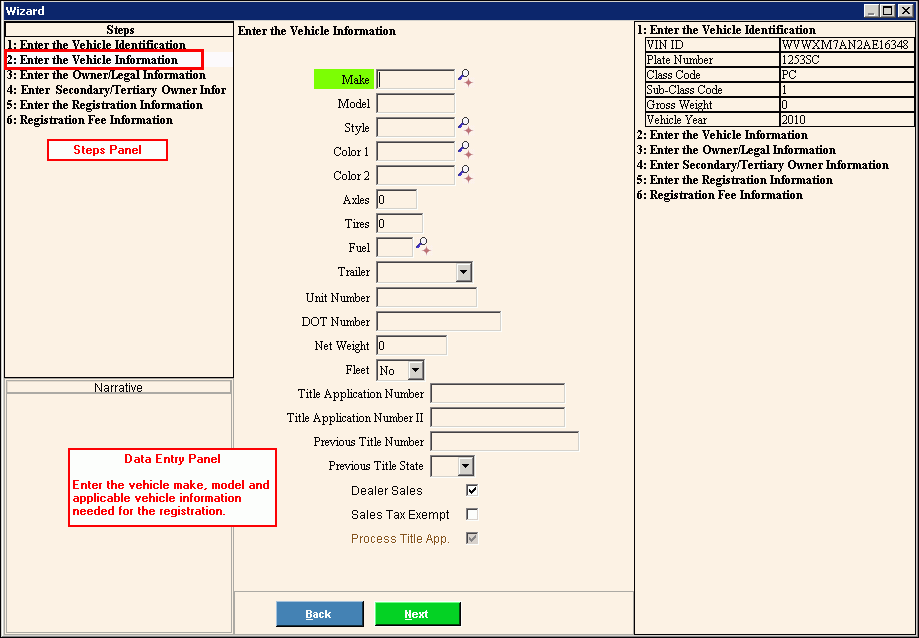
Data Entry Panel - Enter Vehicle Information Step Prompts Tip: To see more information about a field, click the hyperlink for that field name. |
|
Enter the defined vehicle manufacturer. (up to 4 characters) Notes:
|
|
Enter the defined model of vehicle being registered. Notes:
|
|
Enter a defined style of the vehicle being registered. Notes:
|
|
Color 1 |
Enter the defined color of the vehicle. (up to 2 characters) Notes:
|
Color 2 |
Enter the second color, if applicable. (up to 2 characters) Notes:
|
Enter the number of axles the vehicle has. Note: Axles are mandatory for Class Codes AC, AF, AP, BU, CC, CL, CO, FM, WE, TL, TT and for class code TR: SPECIAL MOBILE EQUIPMENT CLASS A. For all other Class Codes, leave Axles blank. |
|
Enter the number of wheels for the vehicle if you are registering a truck. (1.0 numeric) |
|
Enter the defined code for the type of fuel used by the vehicle. (1 character) Notes:
|
|
To specify the type of trailer, if applicable, click a choice in the drop-down list. |
|
Enter the number that identifies a specific vehicle. (4.0 numeric) Tip: The Unit Number is informational only and can be used to identify a specific vehicle in a fleet. |
|
Enter the Department Of Transportation Number for the vehicle, if applicable. (up to 9 characters) Note: The DOT Number is required for certain vehicles. For more information, see DOT Number. |
|
Enter the vehicle's net weight. (6.0 numeric) Note: The Net Weight is mandatory for Class Code SE. It is optional for all other class codes, but should not print on the registration form. |
|
To indicate the vehicle is part of a fleet, click Yes in the drop-down list. Otherwise, click No. Note: If you click Yes, you should maintain a unit number for the vehicle. |
|
Enter the title application number for the vehicle. (up to 9 characters) |
|
Enter the second title application number, if applicable. (up to 9 characters) Note: The second Title Application Number is required when ownership of a vehicle has transferred twice and two Title Applications must be processed (one from the first untitled owner(s) and one from the second untitled owner(s). |
|
When entering a new registration for a used vehicle or when processing a title application, enter the previous title number. (up to 20 characters) Notes:
|
|
Enter the state code for the state of origin where the vehicle came from, if applicable. (2 characters) |
|
To indicate that the vehicle is part of a dealer sale, click to select the box. To indicate that the vehicle is not part of a dealer sale, leave the box blank. Note: If the Dealer Sales option is selected the Title Fee is not assessed during the Enter Registration Fee step. |
|
To indicate the vehicle is exempt from sales tax, click to select the box. To indicate the vehicle is not exempt from sales tax, leave this box blank. |
|
Process Title App. |
To indicate that the title(s) should be processed and title fees should be generated with this registration, click to check the Process Title App. box. Or, if title(s) are not being processed, leave the box unchecked. Note: If this box is checked the appropriate title fees are added to the registration. |
|
To display the previous step, click Back. Keyboard shortcut: [ALT + b] |
|
To display the next step, click Next or press [ENTER]. Keyboard shortcut: [ALT + n] |
|
To close the wizard without validating or saving the data, click Close. |