Click Enter Registration Information in the Steps Panel.
Or,
click Next ![]() or
click Back
or
click Back ![]() until
the data that you want to maintain displays in the Data Entry Panel.
until
the data that you want to maintain displays in the Data Entry Panel.
Data Entry Utility Wizard - Enter Registration Information Step
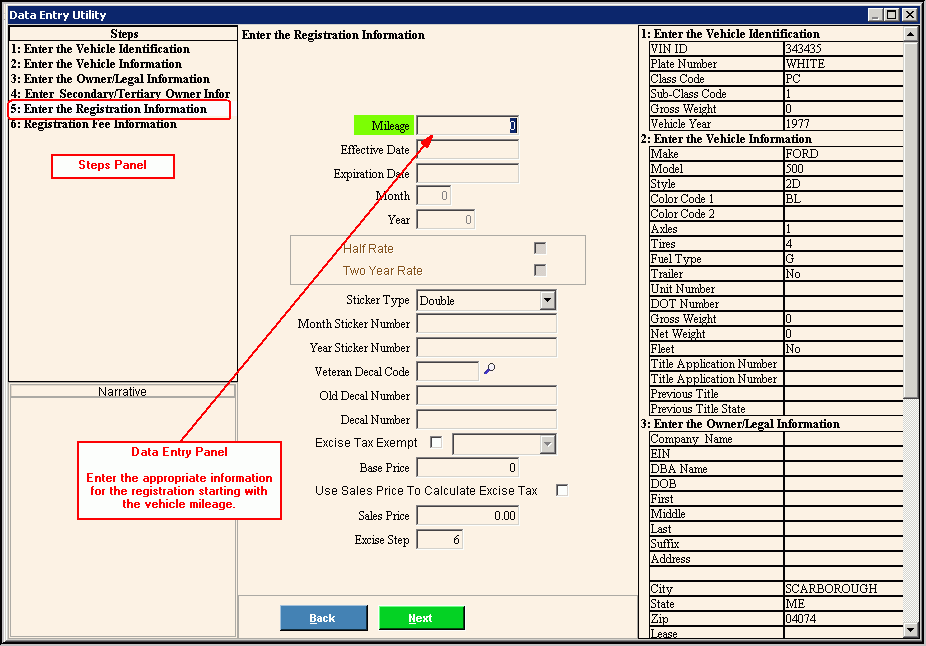
Use the Enter Registration Information Step to enter the registration information for the vehicle including the effective date, expiration date, sticker numbers, veteran decals and vehicle base price or sales price. The table following the panel example describes the data entry for this step in the Data Entry Utility Wizard.
Tip: For general information about using wizards, see the Wizard - Introduction.
Directions:
To display the Enter Registration Information Step in the Data Entry Panel:
1. Open the Data Entry Utility Wizard.
2. To navigate to the step that you want to maintain:
Click Enter Registration Information in the Steps Panel.
Or,
click Next ![]() or
click Back
or
click Back ![]() until
the data that you want to maintain displays in the Data Entry Panel.
until
the data that you want to maintain displays in the Data Entry Panel.
Data Entry Panel - Enter Registration Information Step Example:

Data Entry Panel - Enter Registration Information Step Prompts Tip: To see more information about a field, click the hyperlink for that field name. |
|
Enter the most recent odometer reading for the vehicle. (12.0 numeric) |
|
Enter the effective date for the vehicle registration. (mmddccyy, slashes and century optional) |
|
Enter the registration expiration date that is based on the registration month and registration year for the vehicle. (mmddccyy, slashes and century optional) Notes:
|
|
Note: The month field is not available during this wizard. |
|
Note: The year field is not available during this wizard. |
|
Note: The half rate field is not available during this wizard. |
|
Note: The two year rate field is not available during this wizard. |
|
To specify the type of stickers, click a choice in the drop-down list. |
|
Enter the valid month sticker number for the registration. (up to 8 characters) |
|
Enter the valid year sticker number for the vehicle registration. (up to 8 characters) |
|
Enter the code that uniquely identifies the type of veteran decal. (up to 8 characters) Tip: To view the list of veteran decals, click here. |
|
Old Decal Number |
Enter the decal number from the old truck camper decal number, if applicable. (up to 8 characters) |
Enter the decal number, if you are registering a truck camper. (5.0 numeric) Note: Truck campers are assigned decals instead of stickers when you register them. |
|
To indicate that the vehicle registration is exempt from excise tax, click to select the box. To indicate that the vehicle registration should be charged excise tax, leave this box blank. Note: If you click to select Excise Tax Exempt, you can select from the drop-down list the excise tax exempt description to print on the MVR-3 form. |
|
Enter the MSRP or purchase price for the vehicle found on the manufacturer window sticker. (8.0 numeric) REQUIRED |
|
To specify that the sales price should be used to calculate the excise tax, click to select the box. To omit using the sales price to calculate the excise tax, leave this box blank. |
|
Enter the actual price paid for the vehicle, if you are registering a commercial vehicle. (6.2 numeric) |
|
To accept the default excise step, press [TAB] or, enter another excise step to use to determine the mill rate for calculating the excise tax. (1-6) Note: The system sets the Excise Step based on the age of the vehicle. |
|
|
To display the previous step, click Back. Keyboard shortcut: [ALT + b] |
|
To display the next step, click Next or press [ENTER]. Keyboard shortcut: [ALT + n] |
|
To validate and save the data for all of the wizard steps, click Finish. The wizard window closes when the save is complete. Keyboard shortcut: [ALT + s]
|
|
To close the wizard without validating or saving the data, click Close. |