Click Payment Plan in the Steps Panel.
Or,
click Next ![]() or
click Back
or
click Back ![]() until
the data that you want to maintain displays in the Data Entry Panel.
until
the data that you want to maintain displays in the Data Entry Panel.
Customer Create Payment Plan Wizard - Enter Payment Plan Step
Use the Enter Payment Plan Step to enter the details of the customer's payment plan including the plan start date, the periodic payment amount and total payment plan amount. The table following the panel example describes the data entry for this step in the Customer Create Payment Plan Wizard.
Tips:
For general information about using wizards, see the Wizard - Introduction.
For more information about working with data in fields, see the Data Entry Guidelines.
To display the Enter Payment Plan Step in the Data Entry Panel:
1. Open the Customer Create Payment Plan Wizard.
2. To navigate to the step that you want to maintain:
Click Payment Plan in the Steps Panel.
Or,
click Next ![]() or
click Back
or
click Back ![]() until
the data that you want to maintain displays in the Data Entry Panel.
until
the data that you want to maintain displays in the Data Entry Panel.
Data Entry Panel - Enter Payment Plan Step Example:
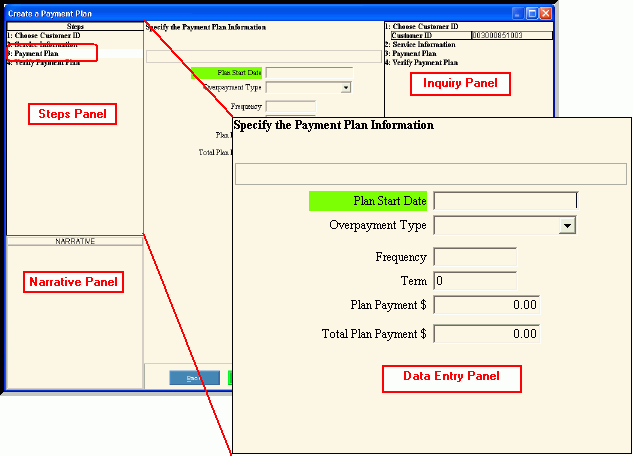
Data Entry Panel - Enter the Payment Plan Step Prompts Tip: To see more information about a field, click the hyperlink for that field name. |
|
Enter the date the customer will start making payments for their payment plan. (mmddccyy - slashes and century optional) |
|
To specify the overpayment type, click a choice in the drop-down list. |
|
To specify the intervals that the customer will make payments, click a choice in the drop-down list. |
|
Enter the number of payments as the terms for the payment plan, if applicable. (2.0 numeric) |
|
Enter the amount the customer agrees to pay on regular basis. Or, leave blank to enter the dates and payment amounts manually. (12.2 numeric) |
|
To accept the customer's outstanding balance as the Total Plan Amount, press [TAB]. Or, enter another amount as the Total Plan amount. (12.2 numeric) |
|
|
To display the previous step, click Back. Keyboard shortcut: [ALT + b] Tip: Back is not active for the first step. |
|
To display the next step, click Next or press [ENTER]. Keyboard shortcut: [ALT + n] Tip: Next is not active for the last step. |
|
To validate and save the data for all of the wizard steps, click Finish. The wizard window closes when the save is complete. Keyboard shortcut: [ALT + s] |
|
To close the wizard without validating or saving the data, click Close. |