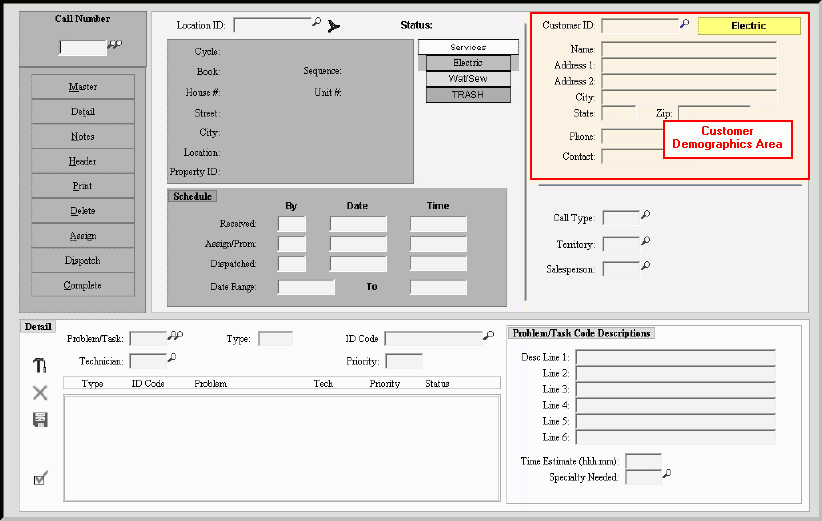
Service Call Entry - Customer Demographics Area
Use the Customer Demographics Area to maintain the customer and contact information for the service call. The table following the window example describes the Customer Demographics Area for Service Call Entry.
Tip: For more information about working with data in fields, see the Data Entry Guidelines.
To display the Service Call Entry - Customer Demographics Area:
1. Click Service Mgt from the Menu Bar.
2. Click Daily Work.
3. Click Service
Call Entry.
Tip: Or, use the keyboard
shortcut: [ALT] [m] [a] [e].
Service Call Entry - Customer Demographics Area Example:
Service Call Entry - Customer Demographics Area Prompts Tip: To see more information about a field, click the hyperlink for the field name. |
|
Displays the Customer ID assigned to the location. To edit, enter the desired Customer ID. (up to 12 characters) Tip:
To search for
a Customer ID, click Search
|
|
Displays the Service that the customer needs a service call for. |
|
Name |
Displays the customer's First Name, Middle Initial and Last Name. |
Displays the first line of the customer's mailing address. |
|
Displays the second line of the customer's mailing address, if applicable. |
|
Displays the third line of the customer's mailing address, if applicable. |
|
Displays the City or Town Name portion of the customer's mailing address. |
|
Displays the State portion of the customer's mailing address. |
|
Displays the Zip Code portion of the customer's mailing address. |
|
Displays the combined three-digit area code and the seven-digit Telephone Number. |
|
To accept the customer's First and Last Name as the contact name for the service call, press [TAB] or, enter another name for the contact person. (up to 15 characters) |
|
![]()