Customer History Report Instructions
Use the Customer History Report to view customer history transaction details. You can specify the information you want to see on the report including the services, the companies, service dates, the finance periods. You can specify whether to report for a group of customers or an individual customer.
Tips:
This report is also known as the History Report or History Transaction Inquiry Report.
For more information about running reports, see Print View.
To see an example of the report, click Customer History Report Sample.
To open:
1. Click Reports from the Menu.
2. Click Miscellaneous.
3. Click History
Report.
Or, use the keyboard
shortcut: [ALT] [e] [m] [m]
[h].
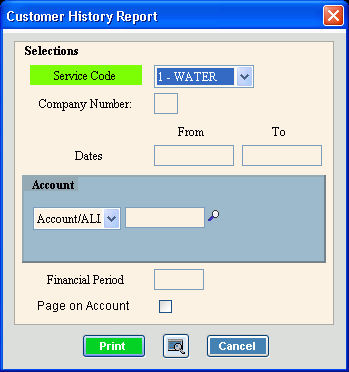
Customer History Report Window Example:

Customer History Report Prompt Options
|
|
To specify the Service to include, click a choice in the drop-down list. (predefined) |
|
To specify the Company Number to include, enter a valid Company Number. (2.0 numeric) Tip: To include all Companies, leave blank. |
|
Date Range |
|
From |
To limit the report to a range of dates, enter a beginning Transaction Date to report. (mm/dd/ccyy) Tip: To include all dates on this report, leave blank. |
To |
To limit the report to a range of dates, enter an ending Transaction Date to report. (mm/dd/ccyy) Tip: To include all dates, leave blank. |
To specify the accounts to include, click a choice in the drop-down list. Entry Options:
|
|
Account/All Step |
|
Account |
To specify an individual account to print, enter a valid Customer ID. (up to 12 characters) Tips:
|
Account Range Step |
|
From |
To limit the report to a range of accounts, enter the beginning Customer ID to report. (up to 12 characters) Tips:
|
To |
To limit the report to a range of accounts, enter the ending Customer ID to report. (up to 12 characters) Tip: To include all customers, leave blank. |
Account List StepWindow Example:
|
|
Account |
To build a list of customers to report, enter a Customer ID to include on the list. (up to 12 characters) Note:
To search for a Customer ID, click Search
|
|
To add the Customer ID to the list, click Add. Keyboard shortcut: [ALT + a] Tip: The added Customer ID displays in the List Window. |
|
To remove a highlighted Customer ID from the list, click Delete. Keyboard shortcut: [ALT + d] Note: You must first click to highlight the desired Customer ID to remove it from the list. |
To specify a Finance Period to report, enter the Finance Period ID. (4.0 numeric) Tip: To report all Finance Periods, leave blank. |
|
Page on Account |
To print each customer on a separate page, select this box. Or, to print customers continuously without a page break between customers, de-select this box. Note: This field is only available when All Accounts is selected at the Account/All prompt. |
|
To begin printing, click Print, or press [ENTER]. Keyboard shortcut: [ALT + p] To print to the Print
View window, click Print
View Or, to escape from the print routine,
click Cancel Keyboard shortcut: [ALT + c] |
Server Process Status |
|
Status |
Displays information pertaining to the various phases of the reporting process to guide you. Note: The status displays Complete when the process is ended. In addition, the Message window displays Time Started and Time Ended to alert you when the routine is complete. |
|
To close the window when the report
is complete, click Close
|