 on the reporting toolbar for the report or process.
Schedule Job Manager
The EDIFICE Schedule Job Manager provides a convenient way to set up non-BUSA reports and EDIFICE processes to automatically run on a daily, weekly or monthly schedule. For example, if you have reports that need to be run each month, you can assign them to run through the Schedule Job Manager. The Schedule Job Manager allows you to manage schedules for jobs. In addition, Schedule Job Manager will show the last time a scheduled process was run. Setting up a report or process to automatically run is a 3-step process that is outlined below. After the jobs are created and schedules are added, all reports and processes assigned to a schedule will automatically run at the designated time.
Important: If you have reports and processes scheduled to run and if in the unlikely event your system is down for a period of time, it is recommended that you check to see if any jobs were scheduled to run during the time the system was offline. If a job did not run, then you will needs to run the job manually and reset the next run date on the schedule. Do this for each job that was affected.
Creating a schedule for generating a report or process is a 3-step process:
1. First, open the report or process that you want to add to a schedule. Enter the report settings and save the settings with a name that identifies the report, for example ATB-MONTHEND. For more information, see saving report settings.
2. Second, using Job Manager create a job for the report or process and assign the appropriate saved report settings to it.
3. Third, use Schedule Job Manager to create a schedule to automatically generate the job.
After the job is created and scheduled, it will run at the appointed
time and frequency. You can view the report from Report
History  on the reporting toolbar for the report or process.
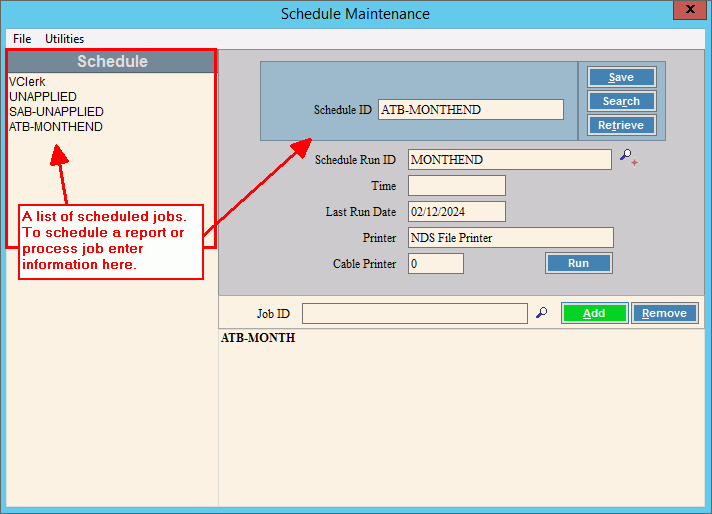
Enter [ALT] S to go to the EDIFICE Setup Utilities menu. Select Utilities and then click Schedule Job Manager. The following screen displays.
Schedule Job Manager Example:

Schedule Job Manager Prompts |
|
Schedule ID |
To
create a scheduled job, enter a unique ID and press [Enter]
or click Or, to display a scheduled job, enter
the ID and press [Enter]
or click Or, to look a scheduled job, click
Search |
Schedule Run ID |
Enter a schedule run ID. To create a schedule, enter a unique
ID for the job and click Fast
Maintenance Or, to look a schedule, click Search |
Creating a Schedule If you click
Fast Maintenance
|
|
Next Run Date |
Enter the date that you want the report to next run. Each time the job is run, the date will be incremented by the number of days of the schedule's frequency. If the frequency is daily, the next run date is incremented by 1 day, if monthly the date is incremented by 1 month, etc. Important: If you have reports and processes scheduled to run and if in the unlikely event your system is down for a period of time, it is recommended that you check to see if any jobs were scheduled to run during the time the system was offline. If a job did not run, then you will needs to run the job manually and reset the next run date on the schedule. Do this for each job that was affected. |
Frequency |
Select the interval for this schedule. Choices: None, Daily, Weekly, or Monthly. |
|
To complete your entries, click Save. |
Time |
Enter the time of day for the report or process to run. |
Last Run Date |
Leave blank. Each time the job is run, the system date will update this date. |
Printer |
Enter NDS File Printer. Note: This is case sensitive and should be entered as shown. |
To
the jobs to assign to the schedule, click Search
|
|
|
To add the job to the schedule, click Add. After adding the job, it will be listed below Job ID. |
|
To complete your entries, click Save. |