EDIFICE Inquiry - Refunds View
Use the Refunds View as a convenient way to generate refunds for accounts that have a credit balance or a deposit balance to be refunded. You can specify a minimum dollar amount an account must have to be eligible for a refund, as well as, choosing the services and companies to examine. You can process all of the steps of issuing a refund, including creating a list of eligible accounts, creating cash adjustments, running an adjustments journal for proofing and posting the adjustments to the accounts and history. In addition, an export function is available, which creates a file containing the accounts payable information for generating the refund checks for customers. Typically, the refunds process should be run after you have posted bills for the companies or services for which you are generating refunds.
Notes:
Use these steps to process refunds from the Refunds view:
Create a list of eligible accounts.
Review and organize the list.
Generate cash adjustments for the amounts to be refunded.
Run the edit journal to proof your work.
Run the Export to generate a file containing the refund information, if desired.
Run the post to update refunds to the accounts and history.
Before you start you will need to set up a debit cash entry type transaction code that can be used across services or an individual transaction code for each service.
To use the Refunds Export Transactions function there may be setup required. Please contact NDS Support at 1-800-649-7754 for assistance.
To transfer credit balances between services for an account, use the Unapplied Distribution function. To transfer credit balances between 2 accounts, use the Balance Transfer Wizard.
From the EDIFICE Inquiry, click Tools and then click Refunds.
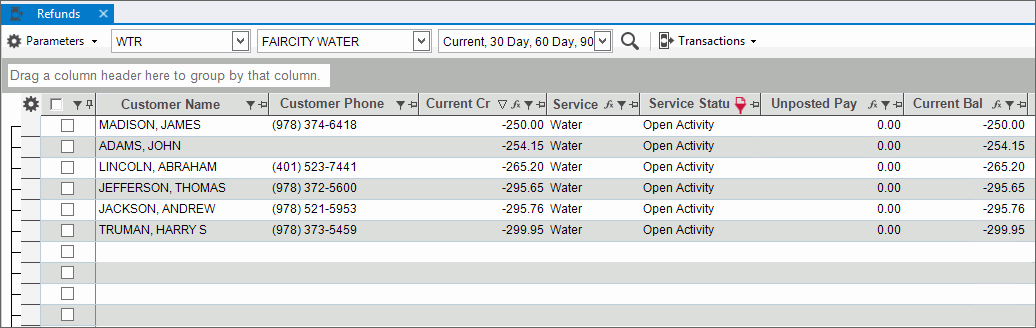
EDIFICE Inquiry - Refunds View Example:
EDIFICE Inquiry - Refunds View Prompts |
|
Create a List of Accounts Eligible for a RefundTo start, click Settings
|
|
Refund Settings |
Choose the options for determining the accounts to include for refunds.
|
To narrow your list to a service or a group of services, click to select the services in the drop-down list. |
|
To narrow your list to a company or a group of companies, click to select the companies in the drop-down list. |
|
Balances |
Select all of the aging balances to consider for credit balances. |
|
To
create the list, click Search
|
Organize Account Refund ListThe Account Refund list shows all eligible accounts in a list for you to review and act on. The list can be sorted and filtered so that you only see the desired accounts. Tip:
Use settings
|
|
Sort List |
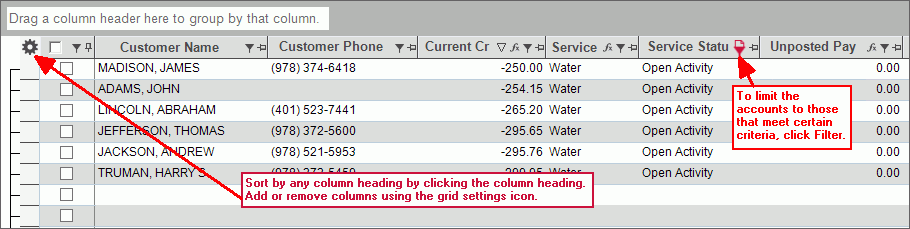
To sort, simply click the desired column heading. To sort in reverse order, click the column heading a second time. For example, you can sort the list by service status or by current balance. |
Filters |
To
limit the accounts to those that meet certain criteria, click
Filter Note: Advanced filtering options are available by clicking Text Filters.
|
Process Account RefundsAfter the
Refunds list of accounts has been organized and reviewed, you
can use the functions on the Transactions
menu
|
|
Batch |
Review the batch ID and clerk that are displayed at the top of the grid.
To change these, click Change
|
Selecting Accounts |
A single account, a group of accounts or all accounts can be selected.
|
Create Adjustments |
From
the Transactions menu, select Generate
Transactions. This will create cash adjustments in
the Cash Adjustments file for the selected accounts. You
can view these transactions from the Cash
Explorer and in the Edit Journal until the Refunds Post is
run. |
Generate Journal |
Select Edit Transaction Journal to run a cash adjustments edit journal for the transactions. Use this to proof the refund amounts before posting them to the accounts. |
Export Transactions to AP |
To generate a file that contains the accounts payable information for the refunds being issued, click Export Transactions. The export information can be used to generate A/P checks for the refund amounts. After the export completes, the following message displays:
|
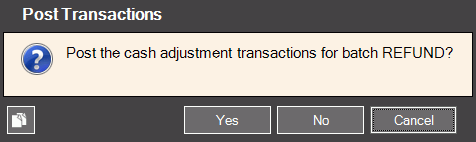
Post |
To run the cash receipts adjustments Post to update the account balances with the refund amounts, click Post. The following prompt displays. Click Yes to begin.
Note: A post completed message is displayed when finished. After the Post completes, view the account balances for the refunded accounts to verify that the balances reflect the refund. |
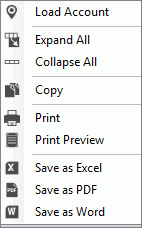
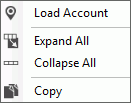
Refunds View Right-click FunctionsTo see additional options, right-click.
|
|
|
|
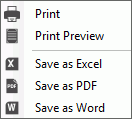
Printing & Exporting FunctionsThese functions can be handy for further manipulating or formatting the data or sending copies to coworkers. In addition, Print and Print Preview functions are available.
|
|
|
These functions can be handy for further manipulating or formatting the data or sending copies to coworkers. In addition, Print and Print Preview functions are available.
|
Window Save As |
The Windows Save As steps:
|


 displays as the list is being built.
 in the list
 next to the desired column heading. Any column can be filtered.
The available filter choices display. Here is an example
of service status filters. To select the choices to use
as criteria, click to check the desired box or boxes and then,
click
next to the desired column heading. Any column can be filtered.
The available filter choices display. Here is an example
of service status filters. To select the choices to use
as criteria, click to check the desired box or boxes and then,
click 

 . The Clerk windows displays where
you can maintain the clerk, batch and the cash date.
. The Clerk windows displays where
you can maintain the clerk, batch and the cash date.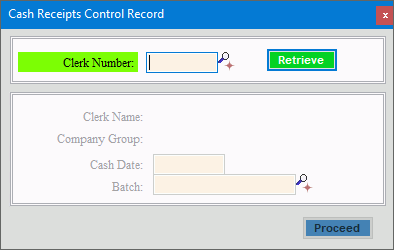
 box.
box.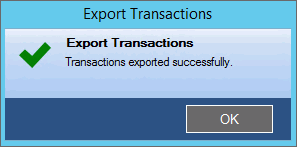
 .
.