Example:
Tip: For the scanner in the example below, you must click Scan. This example of the prompt may differ from your scanner device prompt.
Load Images from Scanner
Images not used by Inventory
Author Reminders:
If your module does not use scanners, omit this topic and update the Images Menu topic.
Fix YourModuleNameHere
Step 8 may not be applicable. See INSight for a sample of the Image Options Window topic.
Index
Style Sheet
WebHelp Table of Contents
Printed Document Contents
Calling Menu Topic - Images Menu
See Also
Loading an image from a scanner copies the scanned image and assigns it to the record displayed in the current program window. The scanned image is stored in the images folder for the software module.
Tips:
YourModuleNameHere automatically converts the scanned image to the JPEG format, identified by the .jpg filename extension.
For more information about images, see the Images Menu topic.
Directions:
To load an image from a scanner into a record:
1. Insert the source document, card, or picture into your scanner.
2. Click Images from the Menu Bar.
3. Click Load Image from Scanner.
4. Click the name of the scanner you are using.
Notes:
The scanner feature is usually activated during installation, if required. If the menu option is unavailable, contact Technical Support for assistance.
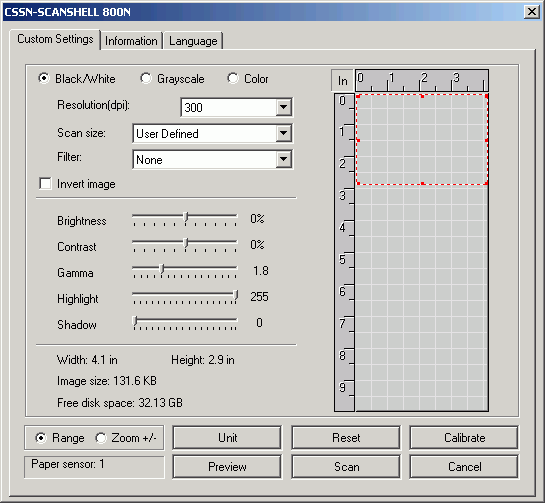
The first time you use the scanner, you may be prompted for calibration. Follow the directions for your scanner device.
Because you can attach more than one scanner to your computer, the first time you use a scanner in YourModuleNameHere, you will be prompted to identify the primary scanner device for future scans. (The Wizards automatically select the primary scanner.)
5. Follow the directions for your scanner device to start the scan. For additional information, click More.
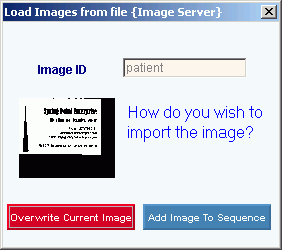
6. You will see the Load Images prompt. To see an example, click More.
7. Enter one of the options available at the prompt window. For additional information, click More.
8. Enter the information at the Image Options Window.
![]()